Loading... Please wait...
Window Regulator Replacement
Please give credit Vthere credit is due! This DIYs completed ENTIRELY by the hardest VIDrking VW Vortex moderator on the site!! Gary Thompson, Ph.D. - vortex ID VGRT6.email address vgrt6@yahoo.com. Please make sure to say thanks to Gary, and if you ever see him at a bar, buy em a beer. These DIY's are more complete than anything Bentley has ever witten!!
REPLACING THE FRONT DOOR WINDOW REGULATOR CUPS AND/OR DOOR LOCK MODULE
The following DIY outlines the procedure for removing the wndow regulator carrier panel, replacing the wndow regulator clips and the door lock module on a MKIV Jetta (some steps may also apply to a MKIV Golf/GTIas well). The procedure was based on a 99.5 Jetta GLS VR6 wth power windows- it may be slightly different on later models and on those wth manual windows. Please do these procedures at your OWl risk and be ready to make small adjustments ....tlile doing them. Also, please be observant ....tlile removing parts so that they go back together correctly.
![]()
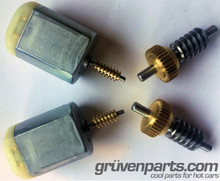
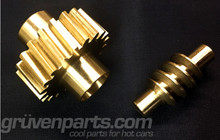
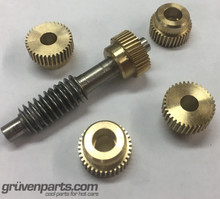
The wndow regulator clips used in this DIY were purchased from IMPEX. The clips were part of the Window Regulator Reoair Kit ....tlich is VW part# llM-898-462-A and cost $47.36 (price quoted on 9/5/03). The set came with four dips {two for the left door and two for the right door) and a cable/take-up reel assembly {only needs to be used if the existing cables are damaged- this part is not a redesigned/upgraded piece).
Itmay be possible to receive a refund for the cost of buying the Window Regulator Repair Kit and doing the repair yourself.As long as you do the process correctly,it should save VW considerable time and money and in many cases, would be in their best interest to have owners do the repair themselves.I'm currently in the process of trying to receive a refund for the clips (purchased after extended warranty was announced).If have any luck,I'llpost the pertinent information for receiving a refund.
The part#s for the lock modules are door specific and may also vary between model and year. Make sure you obtain the correct parts for your vehicle.
The tools needed to replace the window regulator clips and/or door lock module are a flat-head screv.driver,a Phillips screwdriver, T20 and T30 Torx drivers,a lOmm socket (wrench or driver),an Smm triple square tool, a rag,a sheet or blanket and a roll of duct tape. A drill and a set of bits {not sure exactly ....nat size bit) can also be used during the procedure to disconnect the door lock module from the carrier panel. Doing so reduces the number of steps necessary to remove the carrier panel from the door {more detail on this is given below). If you are replacing the door lock module
and do not use the drill to disconnect the door lock module from the carrier panel, you'll also need a small punch to
push out the plastic rivets that secure the door lock module to the carrier panel. This is the recommended method since
the rivets are not destroyed and can be reused v.tlen reinstalling the carrier panel on the door.
Finally,the procedure should take between 1 and 3 hours,depending on experience. Ihave done the procedure
{replacing the wndow regulator dips) four times and this most recent time it took me 2.5 hours,mostly because I spent a lot of time taking pies and notes about the procedure for this DIY. If Ihadn't been taking pies and notes, it would
have taken between 1and 1.5 hours.
(Note: The procedure below is for the front passenger's door specifically. The procedure for the driver's side door is nearly identical, except that the parts are a mirror image of those of the passenger's door. Specific differences between the passenger's and driver's door (very few) will be mentioned in the text.
The procedure below assumes that the window dips have not completely failed and that the window still works (moves up and down with full range of motion). If your dips have failed and the window has fallen into the door, the procedure will be slightly different. I will try to address these differences in the text.
Also, a few of the pictures were taken on a previous occasion (when the driver's door dips were replaced) so there may be slight differences in the colors of parts and of the backgrounds. Please ignore any continuity inconsistencies. If you follow the procedure as written using the pictures as a reference, you should not have any problems completing the procedure.)
![]()
PART - REMOVING THE WINDOW REGULATOR CARRIER PANEL
1. Remove the innerdoortrim panel (shown below) using the directions in the following DIY- Removing front door parts.

2. Once the panel is off, you should see something like this. FYI, I have aftermarket speakers, so your woofers will look different if you have stock speakers. Also, there is some Dynamat on my window regulator carrier panel ( the black panel bolted to the inside of the door) surrounding the woofer. This is not present on a stock panel.

3. Disconnect the harness connector from the top of the woofer. The approximate location of the connector on a stock woofer is shown below.

4. Disconnect the harness connectors for the tweeter and side-view mirror, indicated by the red arrows in the picture below.

5. Remove the harnesses from the harness carrier (indicated by the yellow arrow), as shown below.

6.Using a screwdriver, unplug the two rubber grommets that cover the access holes for the window regulator dips. One of the grommets is shown below.

7. If your window still works (i.e the clips have not completely broken and the window still moves up and down), continue on with the step 8 through 11 and then go directly to step 13 ( skip step 12). If your windows has fallen into the door, go directly to step 12.
8. Depending on the current position of the window, raise/lower the window so that the window regulator clip at the bottom of the window can be seen through the access holes, as shown below. Since the door panel is off, you'll need to use the window controls on the "other" door to do this.

9. The next step is to step temporarily support the window glass while the regulator clips are being changed. Place a rag over the top of the door. Apply a piece of duct tape to the outside of the window, up and over the top of the door and then to the inside of the window. I recommend doing this diagonally with two opposing pieces of tape, as shown below.

ATTENTION: Please make sure to completely secure the wndow with the duct tape. The removal of the window regulator carrier panel requires that the entire weight of the window glass be supported by tape. For this reason, I only recommend using duct tape. Other types of the tape may not be able to support the weight of the window glass. Since the window may have to be supported by the tape for 1-2 hours or more, periodically check to make sure the tape is holding properly and is not peeling away from the glass. If this course, the window glass may fall into the door and shatter!
10. Remove the 10mm bolt that secures each window regulator clip ( two total) to the window glass, as shown below. If you are only replacing the door lock module (i.e not replacing the clips), You do not need to remove the bolt, only loosen it.

11. Lower the window regulator clips approximately 4-6" using the window controls on the "other" door. The clips should disconnect from the bottom of the window - this will help in removing the carrier panel later on. Go directly to step 13 ( skip step 12).
12. If the regulator clipsfail and the window falls into the door, it can be difficult to remove the carrier panel since the window oftrn "gets int he way". If possible, try to remove the window from the door completely. This almost definitely requires the help of a second person. Attempt to pull the window up by its top edge. If you can raise the window nealry out of the door, it probably means that both clips have definitely failed. Try to raise the window so that the clips can be seen through the access holes described in step 8. If this is possible, remove 10mm bolts, as described in step 10 and slide the clips off. Once the clips are off, remove the window from the door by pulling it up and out of the door. This is easiest if you rotate the rear edge out first and pivot the window around the lower front corner toward the front of the car. The window should come out of the door easily. If youre succesful in doing this, put the window aside in a safe place. If you are not able to remove the window from the door ( because it wasnt possible, not because you didn't try), it may mean that one of the regulator clips is still fully or partially intact. If this is the case, you may have to improvise a little during later steps to remove the carrier panel. I can't be more specific about this problem, since each different situation will have its own solution.
ATTENTION: Please be extremely careful when removing the window glass fromt he door. Make sure to have a strong grip on the glass at all times or it may fall and break.
13.Disconnect the harness connector from the regulator motor by pulling down on the retaining side, as shown below.

14. As you pull down on the retaining slide, the harness connector will slide toward the front of the car and off the regulator motor, as shown below.

15. Check to see if the door lock module is riveted to the carrier panel, as shown int he picture below. Normally, the lock module is rivetted to the panel, but if your regulator clips have been replaced already, the rivets may not be present. VW techs are notorious for not reinstalling the rivets when replacing the regulator clips. If your lock module is not riveted to the panel, perform step 16. If your lock module is riveted to the panel, you have two options. You can ( 1) drill out the rivets and continue on with step 16 or you can ( 2) leave the rivets inatct and go directly to step 17. Option 2 is the preferred method since the rivets can be reused when reinstalling the carrier panel on the door - new rivets will not need to be purchased. If you plan on replacing the door lock module, you must perform all of the related steps ( 16 though 24 - do not skip any of these steps).

16. Pop off the rubber grommets for the inner door handle release cable and the door lock pin ( indicated by the yellow arrows in the picture below) and then push the grommets through their respective holes int he carrier panel. after doing this, go directly to step 25 - do not perform steps 17-24 unless you are replacing the door lock module. If you are replacing the door lock module, you MUST continue on with step 17.

17. Remove the small plastic tab on the rear edge of the door with a screw driver. The tab is indicated by the yellow arrow int he picture below.

18. Behind the plastic tab is a retaining screw which is used to secure the blank in the door handle, indicated by the yellow arrow in the picture below. On the driver's side door, the screw secures the piece which surrounds the door lock key slot.

19. Loosen ( but do not completely remove) the retaining screw with a T20 Torx driver. The screw actually has a very small triple square head, but a T20 driver works perfectly. The retaining screw can be seen in the picture below.
20. Loosen the retaining screw enough so that the handle blank slides out of the door. The passenger's and driver's side pieces can be seen in the pictures below. On my car, the screws needed to be turned approximately 13-15 turns for pieces to slide out. Also, you may need to pull out on the door handle slightly to allow each piece to slide completely out.

21. The outer handle is connected to the door lock module by a small cable ( red arrow in picture below). The end of the cable is secured to the handle by a small plastic tab ( yellow arrow in picture below) which fits into the threaded groove.
22. Pop the tab on the end of the cable out of its retaining groove using a small screwdriver, as shown below. Before doing this, note the position of the tab in the groove so that it can be reinstalled in approximately the same position later.
23. The picture below shows the tab detached fromt he retaining groove.
24. Remove the 2 door lock module bolts ont he rear edge of the door using 8mm triple square tool. The bolts are indicated by the yellow arrows in the picture below.. The 8 mm triple square tool is shown below.
25. Pop off the ruber grommet and push in the wire loom retaining clip indicated by yellow arrows int he picture below.
26. The grommet and retaining clip should look like they do int he picture below when step 25 is completed.
27. Put the sheet or blanket on the ground below the door and over the door sill ( as shown below) to protect the sill and carrier panel when the panel is removed from the door.

28. Remove the ten(10) 100 mm bolts that secure the carrier panel to the door. The locations of the bolts are indicated by the yellow arrows in the picture below.

29. Starting at the rear bottom corner of the panel, pull the bottom of the panel away from the door slightly, as shown below. You may have the panel up or down slightly to wiggle the bottom of the panel out of the door. This step may be very difficult to perform if the window glass is still sitting at the bottom of the soor, especially if one of the regulator clips is still attached to the bottom of the window. If this is the case, then this is the point int he DIY that you might have to be creative in order to complete the removal of the carrier panel from the door.

30. while holding the bottom of the panel away from the door ( and also supporting its weight). reach behind the panel from below and push the six(6) wire loom retaining clips out of the panel. The locations of the clips are indicated by the yellow arrows in the picture below. If you yank on the clips from the front door of the panel, you will almost surely damage them, making it difficult to reattach them when reinstalling the panel.

31. A Close up of one of the wire loom retaining clips is shown below. The clips are held in place by small tabs on opposite sides of the clip, indicated by the yellow arrows. Push in on these tabs simultaneously and push the clip out of the panel.

32. Oce the tabs are out, lift up on the panel slightly, pull the bottom of the panel away from the door, and then lower the panel toward the ground and toward the front of the car. It is necessary to do this because the window tracks extend above the top of the carrier panel inside the door ( blue arrows in the picture below) and the door lock module extends to the right of the panel inside the door ( red arrow in picture below). If you are removing the carrier panel with the door lock module still bolted to the edge of the door, you do not need to slide the carrier panel toward the front of the car when removing it since the lock module is not attached and will not impede its motion. You'll onlyneed to lower the panel so that the window tracks clear. also pay careful attention to the inner door ahdnle cable and the door lock pin when removing the panel as they are attached to the door lock module and must slide out of the panel.

33. Once the panel is removed from the door, disconnect the harness connector for the door lock module by pressing down on the tab indicated by the yellow arrow int he picture below and then sliding the harness connector away from the lock module. ( FYI, the lock module on the driver's side door is shown in the picture below in case someone notices some inconsistencies int he appearance of the harness/lock module relative to the carrier panel. )

34. Pull the door lock module wire bunch (indicated by the yellow arrow in the picture below) and the harness connector through the hole int he carrier panel. The panel should now be completely disconnected fromt he door.

35. If you plan on replacing the window regulator clips, go directly to part II ( below). If you plan on replacing the door lock module, go directly to part IIII ( below part II)
Most Popular
-
1
-
2

-
3
-
4
-
5