 Loading... Please wait...
Brake Light Switch Replacement
Please give credit where credit is due! This DIY was completed ENTIRELY by the hardest working VW Vortex moderator on the site!! Gary Thompson, Ph.D. - vortex ID VGRT6, email address vgrt6@yahoo.com. Please make sure to say thanks to Gary, and if you ever see him at a bar, buy em a beer. These DIY's are more complete than anything Bentley has ever written!!
INSTALLING A NEW BRAKE LIGHT SWITCH (WITHOUT BREAKING IT!)
The following outlines the procedure for installing a new brake light switch on a MKIV car. It is common for the switch to fail, resulting in either (1) no brake lights when the brake pedal is depressed OR (2) the brakes lights staying on constantly, regardless of brake pedal position AND (3) the cruise control not working. In cars with automatic transmissions, a failed brake light switch will also prevent the car from being shifted out of park since the brake pedal needs to be depressed for this to occur and the car/tranny does not know the brake pedal is being depressed.
The procedure below applies to the most recent 4-pin brake light switches with the following part#s
- 1J0 945 511 B, 1J0 945 511 C and 1J0 945 511 D (the most recent version - if you buy a new switch it will almost certainly be the 'D' version since it supercedes all previous versions). If you have an older style of brake light switch with part# 1J0 945 511 A, then the special installation procedure given below does not apply. See the procedure given at the very end of this DIY for installing this switch.
A new brake light switch (1J0 945 511 D) should cost around $10-15 at your local dealer or slightly less on the Internet (http://www.vwparts.com).
No special tools are needed to perform the below procedure (assuming that you have already accessed the switch by removing the required trim pieces as described in this DIY - RemovingInterior Parts I).
INTRODUCTION
The picture below shows an example of the most recent style brake light switch (either a 'B', 'C' or
'D' switch). If the brake light switch that you want to install does not look like this (i.e., it is an 'A' switch), the proceed directly to the section at the end of this DIY entitled "Installing The Switch ('A' Version)". If you purchase a new switch, then it will most likely be the most recent version, the 'D' switch, and the following installation procedure will apply to you.
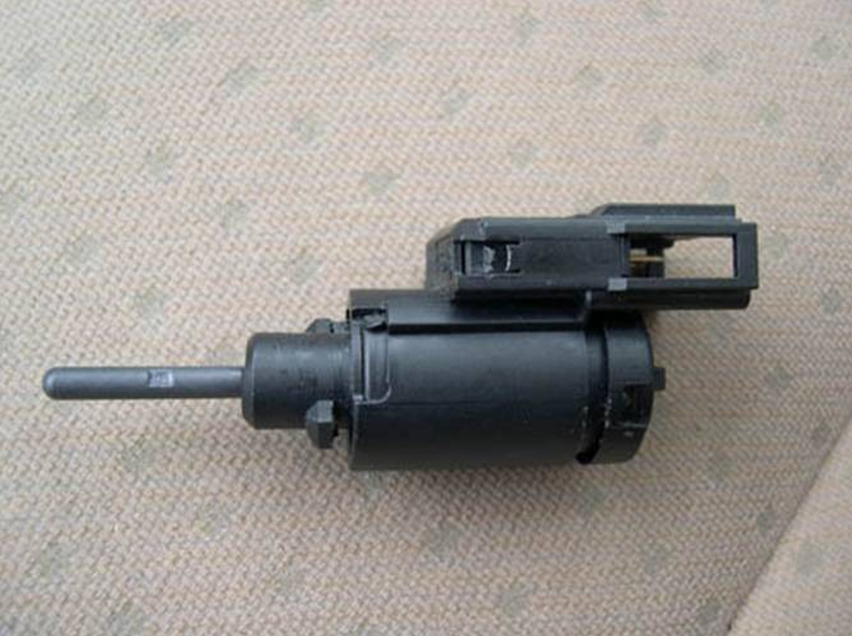
There have been numerous posts on the Vortex about failed brake light switches and a number of different installation procedures have been suggested. Unfortunately, all of them are either incomplete or just plain wrong, and will lead to the switch breaking when being installed. This is probably why many people have posted that it took 3-4 tries (and a new switch with each) to get the switch installed properly. Contrary to what some Vortexers have posted, you CAN move the plunger in and out before the switch is installed without the switch breaking. It actually needs to be able to move when you install it - the plunger on the switch is self-adjusting and will compress a good bit when installed. Also, the switch does not need to be installed with the ignition on and should NEVER be rotated into the locked position with the brake pedal depressed (this is the critical flaw in the previously posted procedures).
After breaking a new switch myself while trying to install it, I decided to disassemble the switch to figure out exactly how the internal mechanism works and why it fails if the switch is installed incorrectly. What I discovered is that the rotating of the switch into place not only secures it to its bracket, it also rotates the internal mechanism into position and locks the plunger length. This is shown in the pictures below. The picture on the left shows the switch in its unlocked (unrotated) state. The two tabs that secure the switch in its bracket are indicated by the blue arrows. Note that there is a third tab (red arrow) underneath one of the tabs. When the switch is inserted into the hole in its bracket and rotated into position, the third tab is pinned against the side of the bracket hole, causing the switch internals to rotate inside of its housing (the internals actually stay put, it's the outer housingthatrotates) The picture on the right shows the switch in the locked (rotated) state. Note that the third tab is not underneath one of the other two tabs anymore and is now visible.
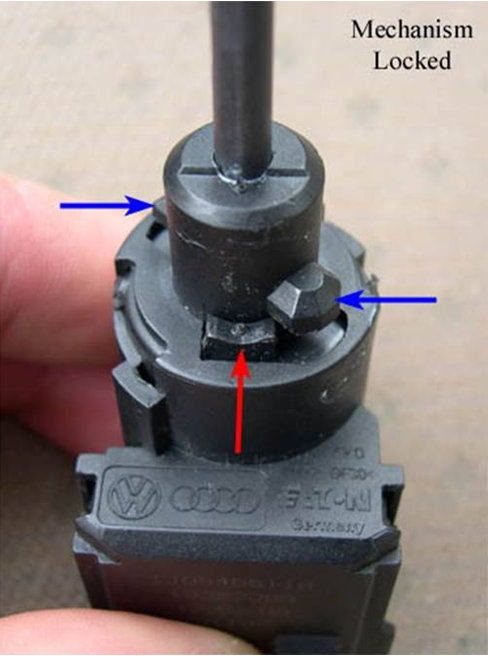
Because of the way that VW designed the switch, part of the internal mechanism will break off if the switch is rotated into position WITHOUT the plunger fully compressed against its spring tension. This is why many people, including dealers, destroy switches when installing them - the switches don't come with installation instructions and people don't understand how the internal mechanism works. Therefore, when installing a new switch, it is critical that the plunger be compressed against its spring tension or the switch will break and you'll need to buy a new one. It is also necessary to
set the correct plunger length so that the brake lights will come on with minimal movement of the brake pedal. Fortunately, the plunger is self-adjusting. The plunger is ribbed on the inside of the switch and will 'ratchet' down to its proper length during installation. The rotation of the switch during installation will then lock this length in.
Now that I've probably confused everyone, it's time for the installation procedure. This procedure is actually very simple, but must be followed exactly or the switch will break.
INSTALLING THE SWITCH ('B', 'C' or 'D' versions)
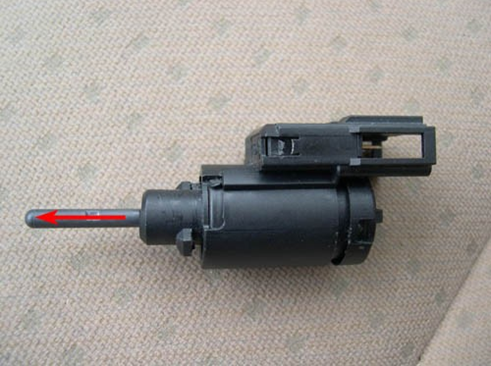
1. Before attempting to install a new brake light switch, first make sure that the switch is in its unlocked state (as described above) AND the plunger is fully extended (approx. 1"). A newly purchased switch should be in this condition and nothing further should need to be done to prepare it for installation - go directly to step 2. If the switch appears to be in its locked state OR the plunger appears to be compressed, then these need to be corrected before installing the switch. To unlock the switch, press the plunger in completely and then rotate the switch housing while holding the plunger in. (Similar to during switch installation, if the plunger is not held in against its spring
tension while doing this the internal mechanism will be broken). If the plunger is not fully extended, make sure the switch is in its unlocked state and then pull the plunger out all the way, as shown below. You should hear a clicking noise from the ratchet mechanism inside as it's extended.
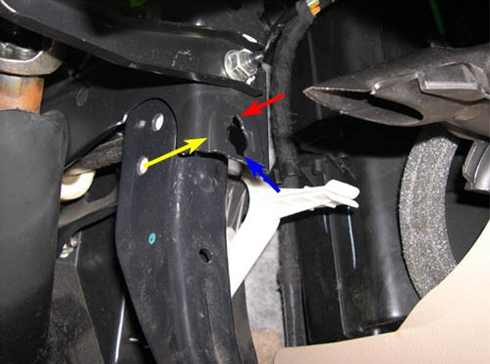
2. The bracket that holds the brake light switch is indicated by the yellow arrow in the picture below. Note that the hole in the bracket is not symmetrical and as a result, the switch can only be inserted one way. The hole is diamond-shaped on top (red arrow) and square on the bottom (blue arrow).
3. Push down the brake pedal as far as it will go. If it does not go down enough, start the car temporarily to loosen the brake pedal and then turn the car off.
4. Insert the new switch into the bracket. For the tabs to line up, the square wiring harness portion of the switch needs to be on top and approximately 35-45° counter-clockwise from horizontal, as indicated by the yellow arrow in the picture below. (Note: The picture shows the brake pedal NOT depressed since I needed both hands to take the picture. It should be fully depressed at this point.)
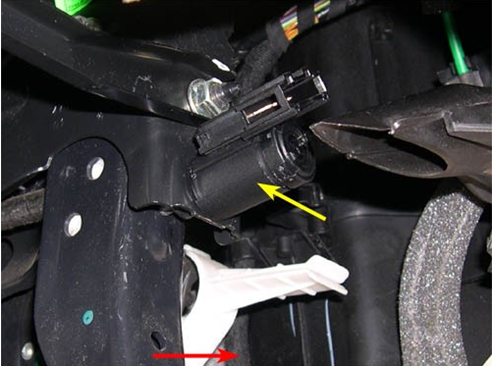
5. While holding the switch in place (DO NOT LET IT PUSH BACKWARDS - THIS IS CRITICAL), release the brake pedal and pull it back slowly as far as it will go (until it hits the stop), as indicated by the red arrow in the picture above. You should hear the plunger click as it compresses. This procedure sets the correct length for the switch plunger.
6. While still holding the new switch fully against the bracket, rotate the wiring harness portion of the switch 35-45° clockwise until it clicks into place, as shown in the picture below.
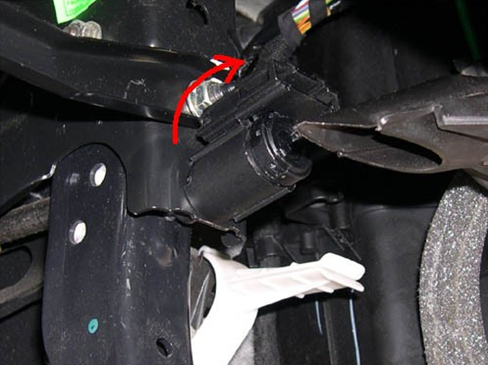
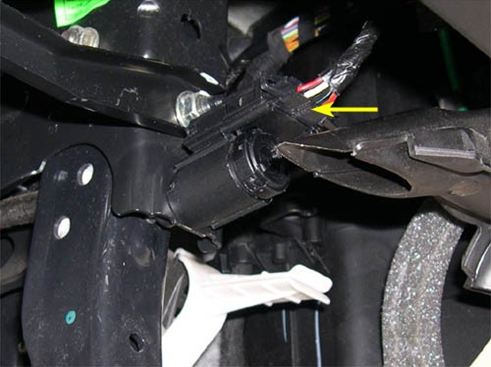
7. Connect the wiring harness to the switch, as shown in the picture below. The switch has been installed correctly and should now work fine.
WARNING: If at any time during steps 5 and 6 the switch backs away from the bracket
(even a little bit), DO NOT ATTEMPT TO ROTATE THE SWITCH INTO POSITION! ! It will
break. Do not just push the switch back against the bracket and then rotate it. YOU MUST REMOVE THE SWITCH, PULL THE PLUNGER OUT ALL THE WAY AND START FROM THE TOP! This is due to the fact that the plunger compresses against its spring tension FIRST and then shortens in length by the ratcheting mechanism. Not doing the process
in one stage may cause the plunger to not be fully compressed against its spring tension (i.e., the plunger will move inwards by permanently shortening instead) which could lead to the internal mechanism being broken when the switch is rotated into position.
Note: Because of the poor (and IMO unnecessary) design of the internal mechanism of the switch, it may still be possible to break the internal mechanism of the switch even if you install it correctly. This could happen if the switch doesn't compress against spring tension first and instead shortens the plunger length first. If this occurs, the internal mechanism may break when the switch is rotated. If this happens, then you got a lemon switch. Unfortunately, there's probably not much that can be done except to buy another new switch since the dealer will most likely assume that you installed it incorrectly.
INSTALLING THE SWITCH ('A' version)
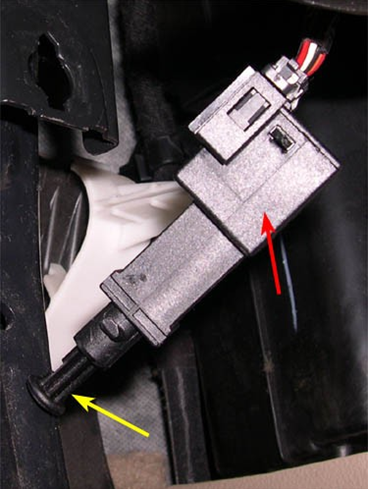
Installing the original 'A' version of the brake light switch (shown in the picture below - note that the body (red arrow) and plunger (yellow arrow) are different) is much simpler than installing the later
'B', 'C' or 'D' switches since the 'A' switch does not have the crazy self-adjusting/locking internal mechanism that the 'B', 'C' and 'D' switches have. To install an 'A' switch, pull the plunger out completely, press down the brake pedal fully, insert the switch into the hole in the bracket, turn it 90° clockwise to secure it and then pull the brake pedal back fully (slowly) to set the correct plunger length. That's it.
I wonder why VW switched to the more complicated design. All it's done is cause us owners (and dealers) a lot of headaches!
Most Popular
-
1
-
2
-
3
-
4
-
5

