 Loading... Please wait...
Pollen Filter Replacement
Please give credit where credit is due! This DIY was completed ENTIRELY by the hardest working VW Vortex moderator on the site!! Gary Thompson, Ph.D. - vortex ID VGRT6, email address vgrt6@yahoo.com. Please make sure to say thanks to Gary, and if you ever see him at a bar, buy em a beer. These DIY's are more complete than anything Bentley has ever written!!
REPLACING THE DUST POLLEN FILTER (ALSO KNOWN AS THE CABIN FILTER)
The following outlines the procedure for replacing the dust pollen filter on a MKIV Jetta and
Golf/GTI. The procedure below was based on a 99.5 Jetta GLS VR6 - it may be slightly different on later-models cars. Please do these procedures at your own risk and be ready to make small adjustments while doing them. Also, please be observant while removing parts so that they go
back together correctly. If you have a Bentley manual, this procedure is covered on page 80-9.
The VW part# for the pollen filter is 1J0-819-644. The cheapest I've been able to find it for is
$14.40 at Auburn VW (http://www.1stvwparts.comor 1-888-528-5280 - if you call, you must tell the parts guy you're an internet customer to get the cheap price).
STEPS:
1. The dust pollen filter is located at the rear passenger's side of the engine bay, just below the plenum. It is accessed by a removable cover on the plenum, indicated by the arrow in the picture below.
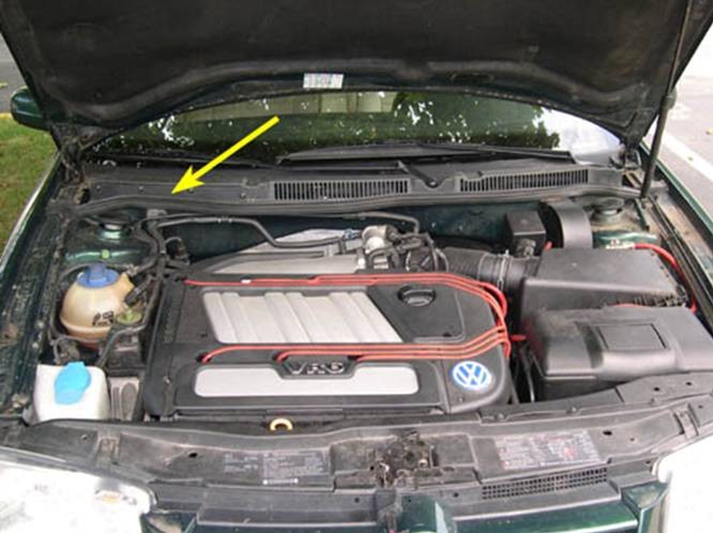
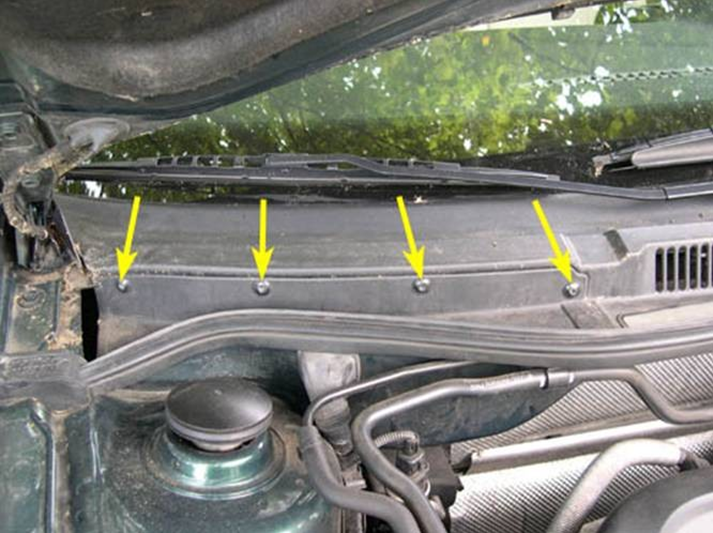
2. Remove the four T25 Torx screws from pollen filter plenum cover. These screws are indicated by arrows in the picture below.
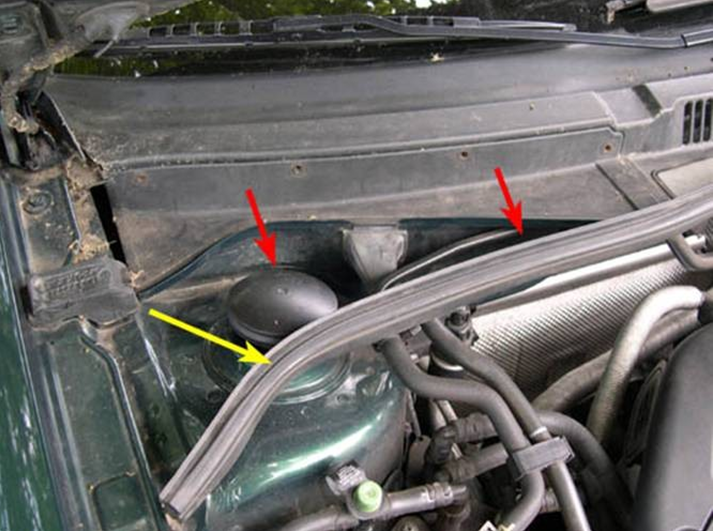
3. Pull up on the rear hood seal (yellow arrow in picture below) and move it out of the way. Begin to remove the pollen filter plenum cover by lifting the front edge slightly to clear the lip at the front of
the plenum (metal) and then pulling toward the front of the car (red arrows).
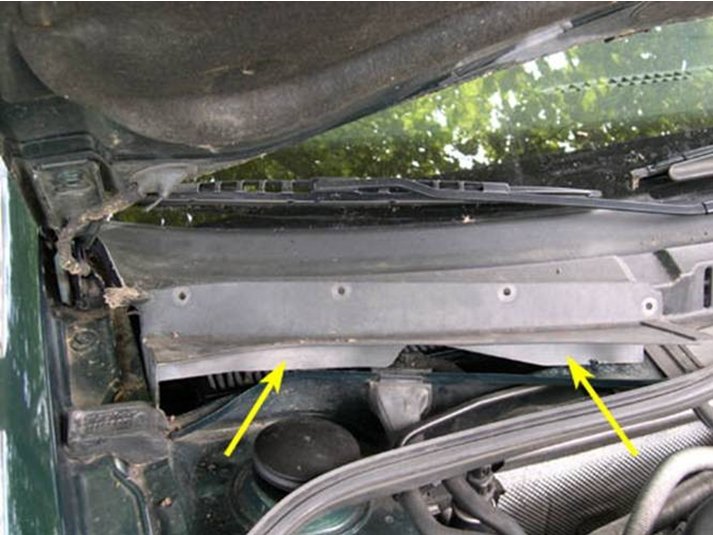
4. After pulling the cover part way out, you'll need to lift it up slightly to allow two wide tabs on the bottom of the cover (indicated by the arrows in the picture below) to clear the lip at the front of the plenum.
5. With the pollen filter plenum cover completely out, it is easy to see the pollen filter (indicated by the arrow in the picture below) seated at the top of the blower motor assembly.
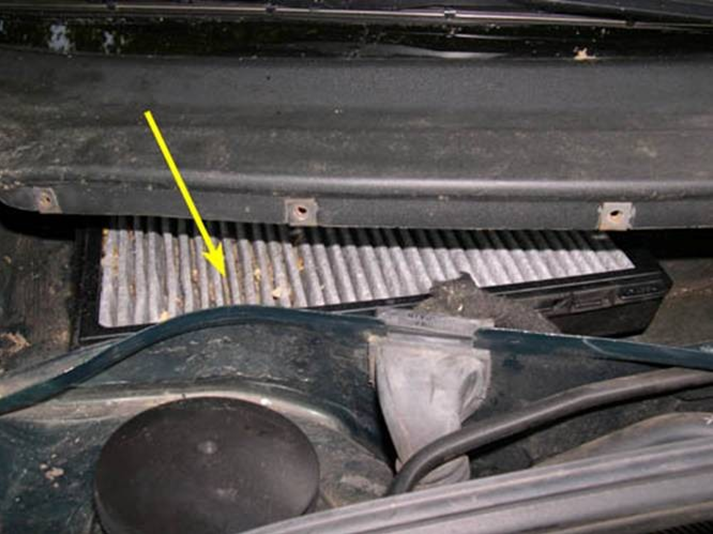
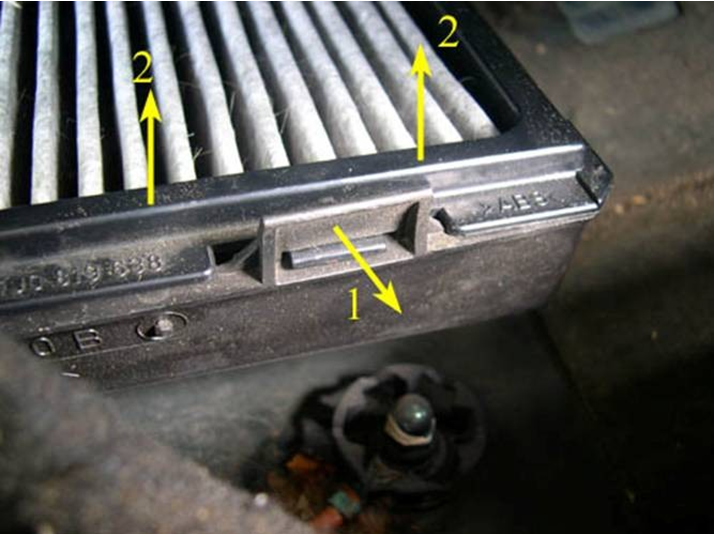
6. The pollen filter is secured to the top of the blower motor assembly by the pollen filter frame. There are two tabs at the front edge of the frame that need to be unclipped (driver's side clip
shown in picture below) to remove the filter frame and filter. Pull both retaining clips toward the front of the car to release the tabs (1) and then move the front edge of the frame upward (2). After
moving the front edge up about 1.5", slide the filter frame and filter together out from under the plenum.
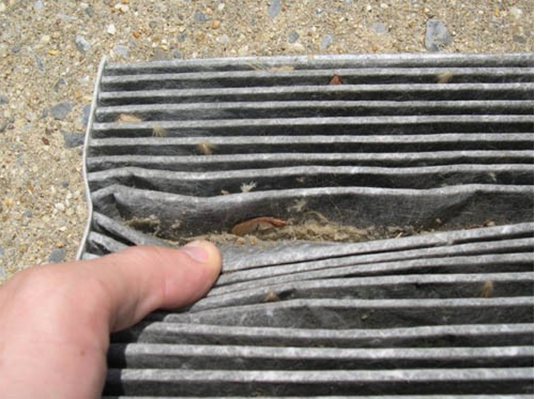
7. The picture below gives a better view of how much pollen and debris the filter actually prevents from getting into the cabin of the car. While the filter in the picture had not been changed in about
50k miles, I routinely scraped the pollen and debris out from between the fins. The space between the fins was free of pollen and debris only 4k miles before these pictures were taken.
8. If you would like to spray some disinfectant into the HVAC system, now is the time to do so. With the filter frame and filter out from under the plenum, you should now be able to see the fan blades of the blower motor assembly just below where the filter normally sits. I've never done this, but I
believe you start the car, turn on the fans, turn on the A/C and then spray the disinfectant into the blower motor.
9. Remove the old pollen filter from the frame and install the new one into the frame. Make sure the air flow arrows on the long edge of the filter are pointing in the correct direction - they should be pointing toward the ground and the frame should be on top of the filter. When installing the new filter into the frame, make sure that the long edge of the frame covers the long side of the filter, as
shown in the left picture below. Make sure the short edge of the frame slides into the first (shortened) fin of the filter element, as shown in the right picture below. This ensures that all airflow passes through the filter element and not between it and the frame.
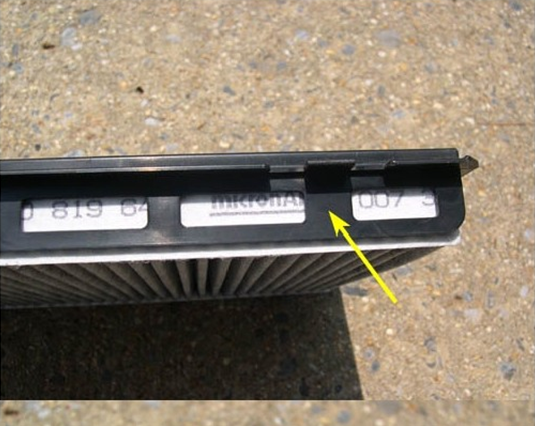

10. On the rear edge of the filter frame, there are three small tabs which must slide into corresponding slots when the fiIter frame and fiIter are reinstalled under the plenum One of these tabs is shown in the picture below.

Nowfor the hard part - getting the filter frame and filter and the plenum cover back in place. I hate these next steps. The top of my hands always manage to get scraped up by the plastic trim above the plenum cover opening. Definitely have a after doing these next steps.
11. Slide the filter frame and filter into place underneath the plenum together as a single unit, as shown in the picture below. Make sure not to let the frame and filter separate too much while doing this. If the filter drops too far out of the frame, the sides of the frame will come out from in between the end fins of the filter and the seal will not be correct when installed. Make sure the 3 tabs on the rear of the frame slide correctly into place and then push the front edge of the frame downward to get the two retaining tabs to catch. This is somewhat difficult to do and may take a few attempts. I needed two attempts to do it while taking the pictures for the DIY and I've done the procedure about a half dozen times.

12. The picture below shows the filter frame and filter correctly reinstalled. If the reinstallation is done correctly, the two retaining tabs on the front edge of the frame should click into place easily and there should be no gaps between the filter frame and the top of the blower motor assembly on the sides. It's hard to describe, but you'll be able to tell when the frame and filter are installed correctly.
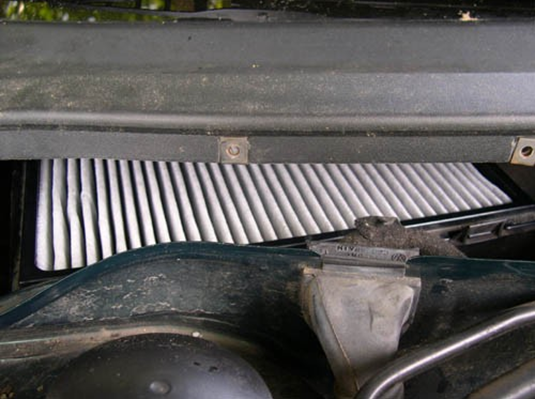
13. Next slide the pollen filter plenum cover back into place. This will take some wiggling back and
forth due to the weird shape of the cover and the extremely tight space. The hardest part is getting the leftmost (passenger's side) edge of the cover (yellow arrow in picture below) to slide under part of the hood hinge mount (red arrow in picture below) and below a metal tab which sits directly below the rain tray at the base of the winshield (approximate position is show by the green arrow in the picture below). It takes quite a bit of force to get this to happen - don't be afraid to twist and push hard on the cover piece. It's relatively tough to break/harm.
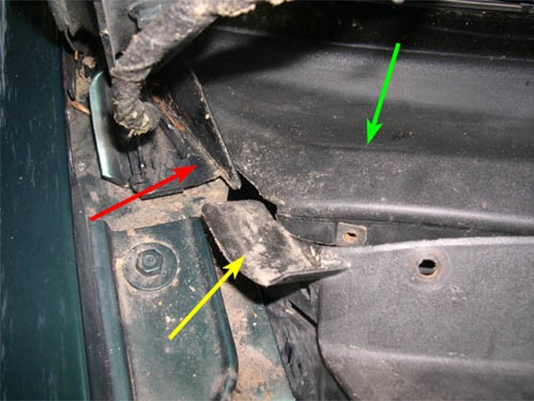
14. One the cover is back in place (and you put down the celebratory ), put the four T25 Torx screws back in, reinstall the rear hood seal and you're done.
Most Popular
-
1
-
2
-
3
-
4
-
5

