 Loading... Please wait...
Door Locked EXPLAINED
Please give credit where credit is due! This DIY was completed ENTIRELY by the hardest working VW Vortex moderator on the site!! Gary Thompson, Ph.D. - vortex ID VGRT6, email address vgrt6@yahoo.com. Please make sure to say thanks to Gary, and if you ever see him at a bar, buy em a beer. These DIY's are more complete than anything Bentley has ever written!!
MKIV DOOR LOCKS EXPLAINED !!! ...
Since so many people with '99.5-'01 MKIV cars seem to be having trouble with their door locks not working properly (also prevalent in B5 Passats), I thought I'd put together a quick explanation about how the locks work in our cars and why there's been so many problems. People with the newer and quieter door lock mechanisms should not have the problems described in this thread - the problem appears to be fixed in these modules.
If your door locks behave like their from another planet (e.g., a door doesn't lock when it's supposed to, the car doesn't recognize a door's been opened, a door automatically relocks itself even when it's open and sets the alarm off ... the list goes on and on ...), then you know exactly how frustrating this problem is. Personally, I'm sick of having to double-check that my driver's door has actually locked - that's why I did a little investigating about what's going on.
Unlike door locks in older cars which are relatively simple mechanical devices along with a separate plunger switch to determine if a door is open or closed (kind of like on your fridge), the door locks in recent-model VWs are complicated electro-mechanical devices with everything (latch, microswitches) in one relatively compact unit or 'module'.
Here are some pics which should help explain what I'm talking about.
The picture below shows the rear edge of one of the doors on my 99.5 Jetta. The only part of the door locks that is visible is the latch mechanism that hooks onto the u-latch on the b-pillar.
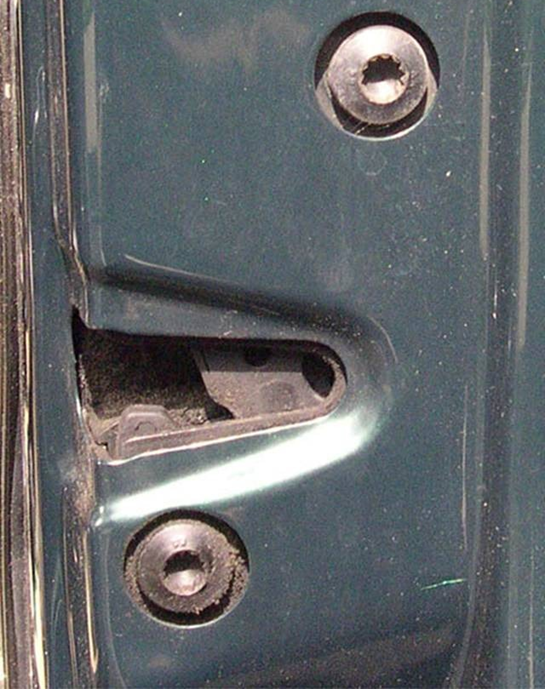
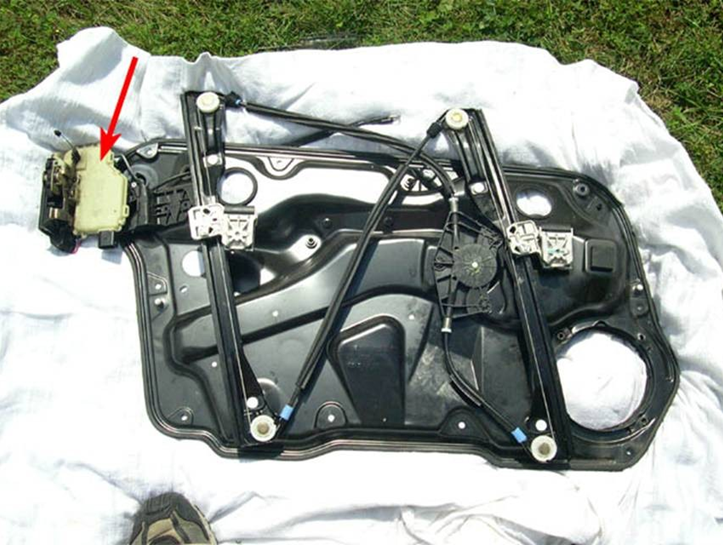
is means that VW put the entire door lock mechanism INSIDE the door. To do any kind of work on it, you need to take the inner door panel off and then remove the window regulator carrier panel. The door lock module is attached to the inside of the carrier panel and is also secured to the edge of the door (by the two 8mm triple square bolts in the picture above). If you remove the carrier panel and door lock module from the door, you'll see the following. The door lock module is indicated by the red arrow.
The two images below show the front and rear sides of the module after it's been disconnected from the carrier panel. The red arrows point to the cable that connects to the interior latch used to open the door, the red arrows point to the edge of the module that's attached to the rear edge of the door and the green arrow points to the cable that connects to the exterior door handle.
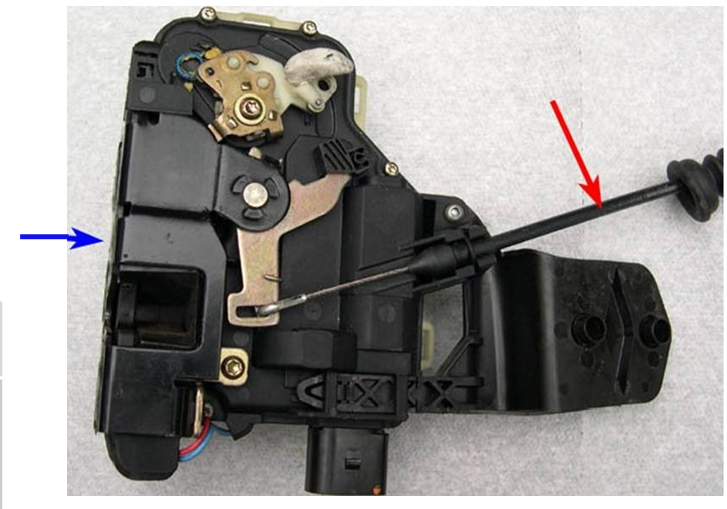
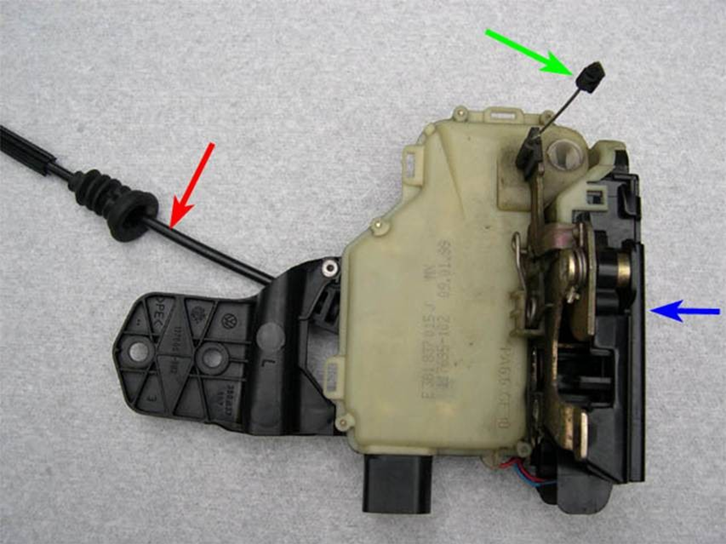
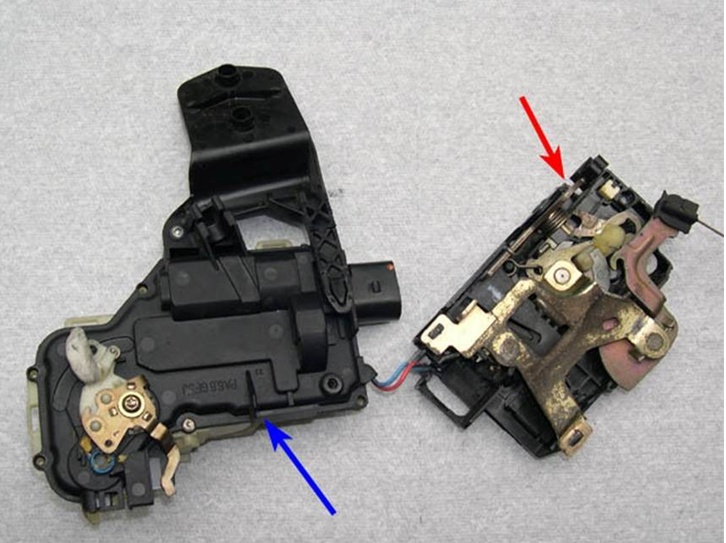
he lock module separated into its two major parts, the electronics portion (circuit board, microswitches, etc) indicated by the blue arrow and the mechanical portion (latch mechanism, cable mechanisms, etc) indicated by the red arrow.
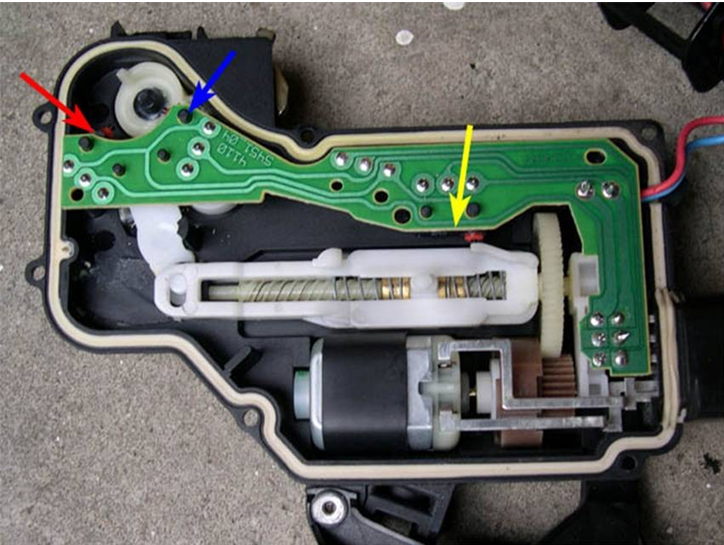
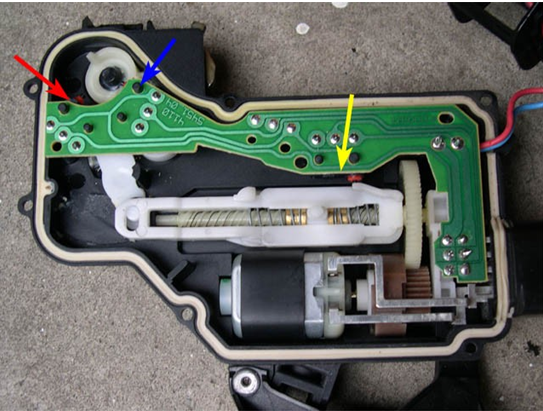
By taking the electronics portion of the lock module apart, it becomes clear that the module uses no less than FOUR microswitches to keep track of the state and operation of the door. Two microswitches (red and blue arrows) are used to detect if the key is being turned in the driver's handle to lock/unlock the doors and open/close the windows and sunroof. A third microswitch (yellow arrow) is used to monitor the state of the locking mechanism, i.e., whether the door is locked or unlocked.
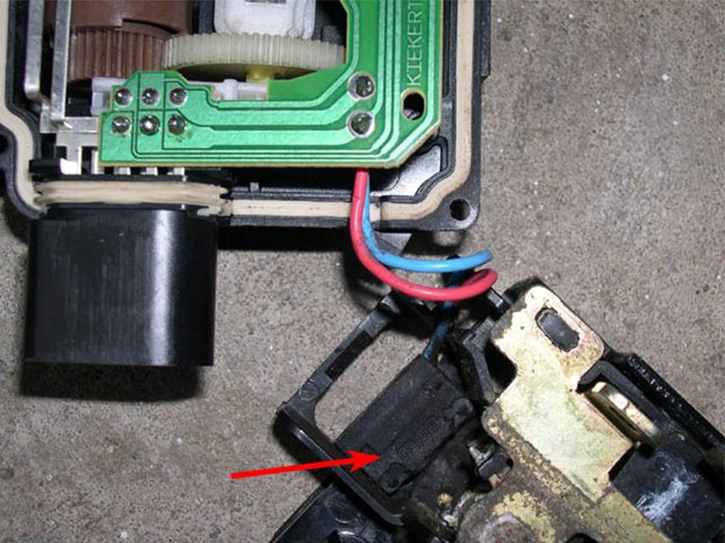
The fourth microswitch is actually in the mechanical portion of the lock module (red arrow in picture below) and is connected to the electronics portion by the red and blue wires. This microswitch detects whether the door is open or closed by monitoring the position of the latch mechanism.
WHY YOU'RE HAVING PROBLEMS WITH YOUR DOOR LOCKS !!!
... or in other words, why do the locks behave like some demon child conjured up by VW engineers one night after a few too many s at OktoberFest?
It has been speculated for a while now by myself and a few others that the problems with the door lock module was a sticky microswitch - this would explain the sometimes intermittent nature of the problems and also would explain why a good, hard whack to the edge of the door near the lock module would temporarily solve them. After reading the following DIY REPAIRby TaligentX, it's clear now that the microswitches in the lock module are perfectly fine. Rather, the problems are due to
poor soldering of the contacts between the pins on the locks module's electrical harness connector and the printed circuit board in the lock module.
The region of interest is circled in red in the picture below.
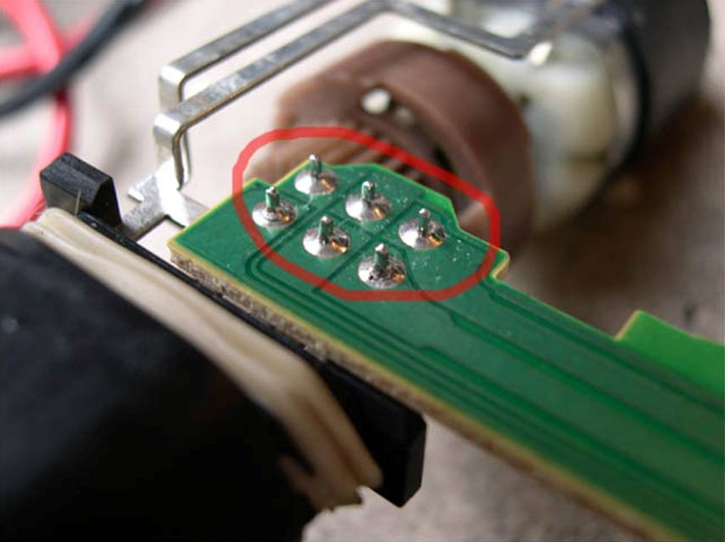
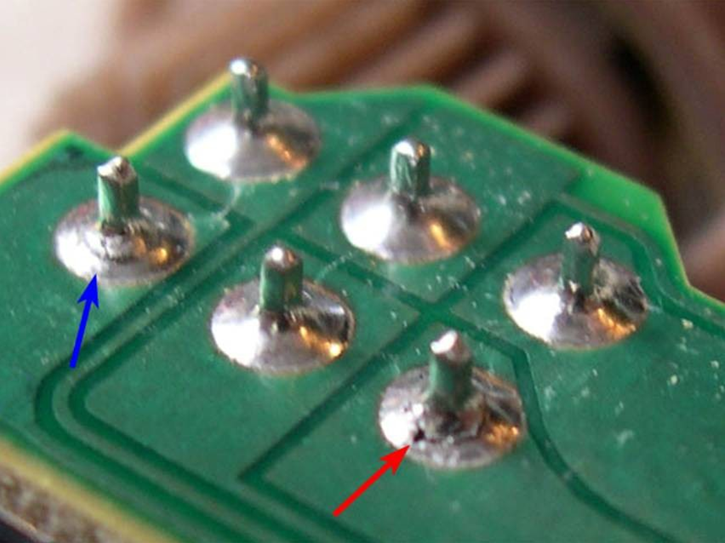
The reason for the problems with the lock modules is clear in the close-up image of this region below. For some reason (bad solder choice, not enough solder, too much physical movement ... who knows???), the solder joints that connect the leads in the harness to the printed circuits for the microswitches tend to crack over time, resulting in either an intermittent or no connection between the two. I found two contacts cracked - pin#3 (blue arrow) and pin#7 (red arrow). Based on the few cases I've heard about where the module was taken apart and solder joints were cracked, it appears that the joints for pins#3, 5 and 7 are the problematic ones.
THE SOLUTION !!!
The solution to the problem is actually very simple. Using a low-wattage soldering iron and some solder, all you need to do is remelt the solder joint (to reestablish the connection) and add a small amount of solder (to beef up the connection).
I did this on my Jetta today and the module now works perfectly!!! If only I had know about this three years ago when the lock module started acting up. To make sure that the problem shouldn't happen again, I not only resoldered the joints for pins#3 and 7, but also for pin#5 ... just in case!
If you want to do this on your car, you can use the following DIY to remove the door lock module from your car door ...
HOW TO REMOVE YOUR DOOR LOCK MODULE
As I write this, vasillalov is putting together a DIY for disassembling the lock module and resoldering the damaged contacts. I'll post the link here when it's done.
You can also use the TaligentX DIY to repair the lock module - the door panel removal portion is Passat-specific, so use my MKIV DIY instead.
UPDATE: (8-20-04)
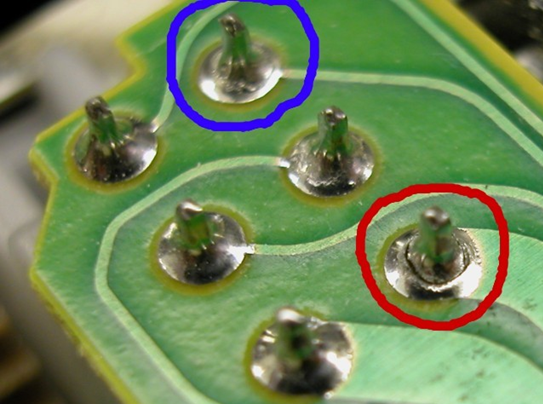
I fixed my front passenger's door lock module this weekend and found exactly the same thing wrong - pins#4 (blue) and 8 (red) were also cracked. Ironically, this lock module was actually working recently, but gave me problems for over a year a while back.
Between my two modules and the one in TaligentX's DIY, the failures have all occurred on the same two pins (3 and/or 7 on driver's side and 4 and/or 8 on passenger's side). Even though this is only three cases, I'd bet that most/all of the other failures out there are for exactly the same reason. I'd say there appears to be enough of a reason for VW to issue an extended warranty on these parts.
UPDATE: (8-26-04)
I met up with a local Vortexer (melmandc) on 8-24-04 to fix his door lock module. Upon taking it apart, we found that the solder contacts that failed in my and other modules were perfectly fine. What failed instead was the microswitch in the mechanical portion of the module that detects if the door is open. It's the one marked by the read arrow below.
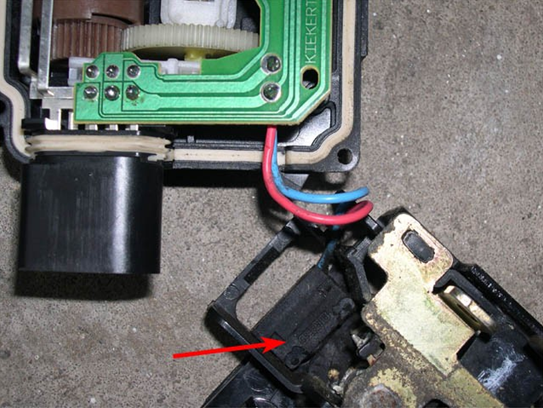
I should have figured this out before removing and opening up the module since his symptoms were slightly different than most. On his car, if you unlocked the driver's door, opened it up and didn't put the key in the ignition or open another door, the driver's door would automatically relock. This is the classic situation that most people experience - the car doesn't recognize that the door has been opened. The thing that makes his situation different is that the lock module WILL lock and unlock whether the door is open or closed, unlike most problems where the lock module WILL NOT lock whether the door is open or closed.
UPDATE: (11-4-04)
I should have posted this info a while ago, but better late than never! The Cherry part numbers for the three small microswitches in the electonic portion of the lock module in the picture below are as follows (info taken from HEREor HERE:
DK-1-G-UL-A0 (red and yellow arrows) DK-1-G-TR-A0 (blue arrow)
I still haven't found the Burgess part number for the fourth microswitch in the mechanical portion of the lock module. I'll post it as soon as I find it.
UPDATE: (7-30-05)
A fellow Vortexer alerted me to this thread over at TDIClub.com about a cheap fix for failures of the 4th microswitch (the one in the mechanical portion of the module). I haen't done the fix myself, but it looks promising.
Most Popular
-
1
-
2
-
3
-
4
-
5

